
Screen recording has become an essential feature for many iPhone users, whether it’s for sharing gameplay footage, creating tutorials, or simply capturing a funny moment to send to friends. However, not everyone knows how to screen record on iPhone or even that the option exists. If you’re one of those people, fear not! In this step-by-step guide, we’ll show you exactly how to screen record on iPhone, so you can start recording and sharing your screen with ease.
Whether you have the latest iPhone model or an older one, we’ve got you covered.So, let’s dive into the world of screen recording and discover just how easy it is to capture and share your screen on iPhone.

Understanding screen recording on iPhone and why you might use it
Screen recording on iPhone has become a popular and essential feature for a variety of reasons. It allows you to capture and share your screen activity with ease. So, why might you want to use screen recording on your iPhone?
One common reason is for creating tutorials. Whether you’re teaching someone how to navigate a new app or sharing a step-by-step guide on a particular topic, screen recording is a valuable tool. It allows you to visually demonstrate each step, making it easier for viewers to follow along and understand.
Screen recording is also great for gamers. If you’re proud of your gaming skills or want to share an exciting gameplay moment with friends, recording your screen is the way to go. It captures the action as it happens, allowing you to showcase your gaming prowess.
Additionally, screen recording can be useful for troubleshooting and technical support. If you’re experiencing an issue with your device or an app, recording your screen can help you document the problem and share it with customer support or online communities for assistance.
Lastly, screen recording can simply be a fun way to capture and share moments with friends and family. Whether it’s a funny video, a memorable conversation, or a cute pet moment, screen recording allows you to preserve these moments and easily share them with others.
Step by step process to enable screen recording feature on your iPhone
Screen recording on iPhone is a useful feature that allows you to capture and share your screen activity with ease. If you’re wondering how to enable this feature on your iPhone, don’t worry – we’ve got you covered with a step-by-step guide.
To start you are going to want to add the screen record to your swipe down Control Center on your iphone.
- To do this you will start off by selecting the > Settings app on your iPhone.
- Next Scroll down and tap on > “Control Center.” From there, tap on “Customize Controls.”
- You’ll see a list of available controls – look for the green “+” button next to> “Screen Recording” and tap on it to add it to your Control Center.
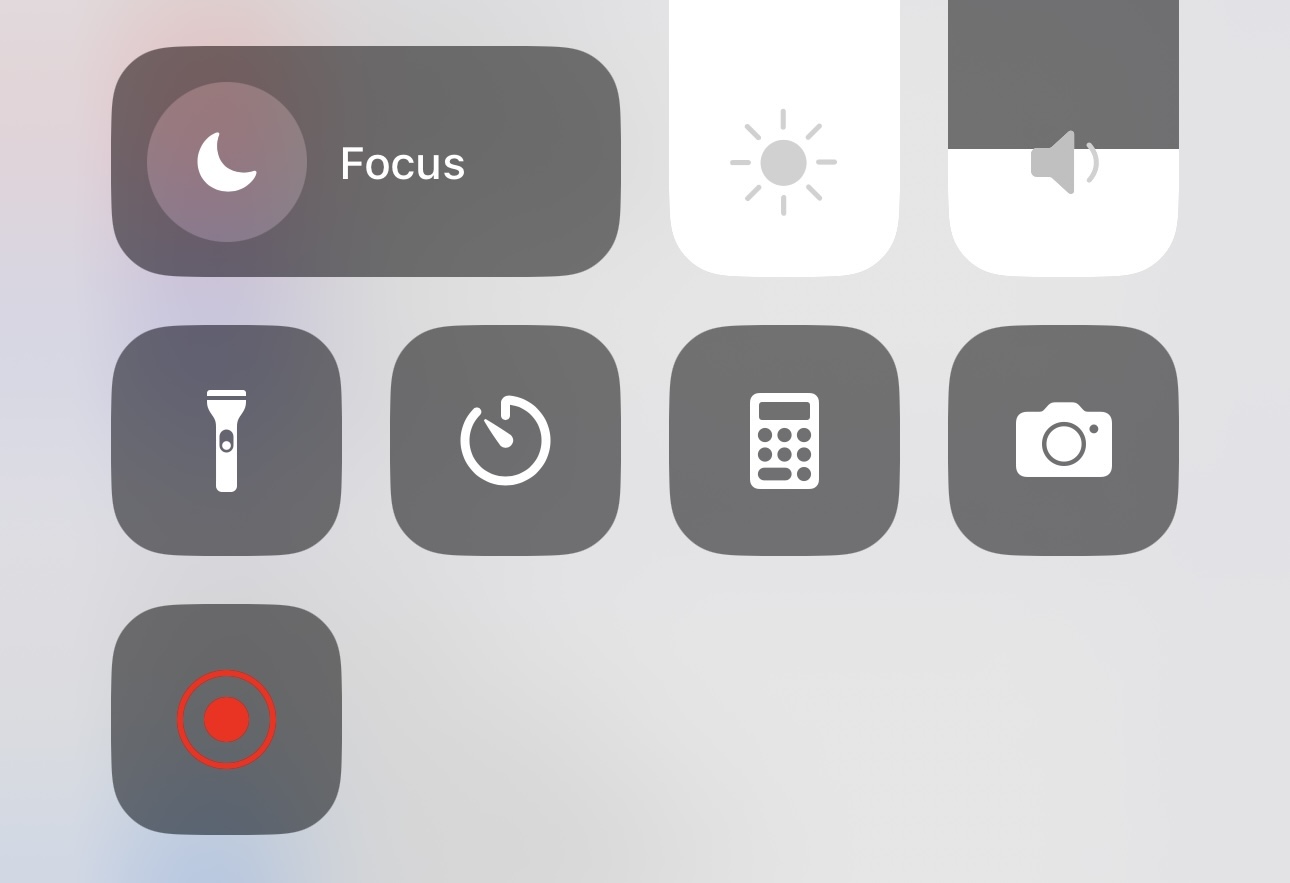
Once you’ve added screen recording to your Control Center, you can access it by swiping down from the top right corner of your screen (or up from the bottom, depending on your iPhone model) to open the Control Center. Look for the screen recording icon – it looks like a solid circle inside a larger circle – and tap on it.
Before you start recording, you can customize some settings by long-pressing the screen recording icon. You can choose to record your microphone audio, enable or disable the microphone audio, and adjust the video quality. Once you’re ready, tap on “Start Recording” and a three-second countdown will begin. Of course if this all seem to confusing just reference our video for step-by-step instructions.
While recording, a red bar will appear at the top of your screen to indicate that screen recording is in progress. You can freely navigate through your apps and perform any actions you want to record. When you’re done recording, simply tap on the red bar and confirm your action by tapping on “Stop.”
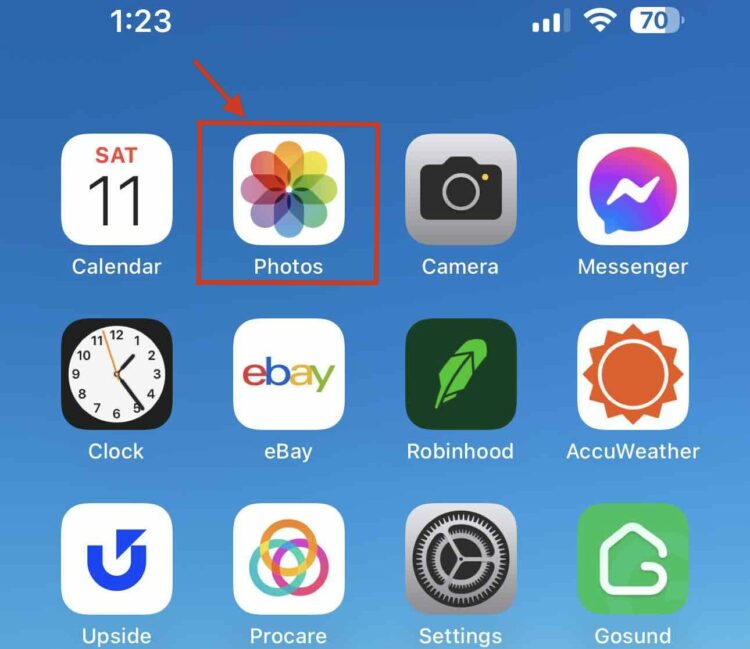
That’s it – you’ve successfully enabled and used the screen recording feature on your iPhone! Your recordings will be saved in the Photos app, where you can access and share them with ease.
Practical tips for efficient screen recording
1. Clear your device’s storage: Before you start recording your screen, make sure you have enough storage space available. Screen recordings can take up a significant amount of storage, so it’s important to delete any unnecessary files or apps to free up space.
2. Plan your recording: Take a moment to plan out what you want to record before you start. This will help you avoid any unnecessary pauses or mistakes during the recording process. Consider creating a script or outline to keep yourself on track.
3. Use a stable surface: To ensure smooth and stable screen recordings, place your iPhone on a stable surface. Avoid holding it in your hand, as this can result in shaky footage. Consider using a tripod or propping your device up against a stand or stack of books.
4. Adjust the brightness and sound: Before you start recording, adjust the brightness and sound settings on your iPhone. Ensure that the brightness is set to an optimal level and that the sound is clear and audible. This will enhance the overall quality of your screen recordings.
5. Use gestures effectively: Utilize gestures to navigate through apps and perform actions during your screen recording. Familiarize yourself with common gestures like swiping, tapping, and pinching, as they can help you showcase specific features or actions on your screen.
6. Edit your recordings: After you’ve completed your screen recording, consider editing the footage to enhance its quality or remove any unnecessary portions. You can use editing software or apps to trim the recording, add captions or annotations, and make any necessary adjustments.
How to access and share your screen recordings
Once you’ve successfully recorded your screen on iPhone, the next step is accessing and sharing your recordings. Thankfully, it’s a simple process that can be done in just a few taps.
To access your screen recordings, open the Photos app on your iPhone. Look for the “Albums” tab at the bottom of the screen and tap on it. Scroll down until you find the “Media Types” section, and then tap on “Screen Recordings.” All of your screen recordings will be stored here.
To share your screen recordings, tap on the recording you want to share. This will open the recording in full-screen mode. Look for the share button, which looks like a square with an arrow pointing upwards. Tap on it, and a menu will appear with various sharing options.
From here, you can choose how you want to share your recording. You can send it as a message or email, share it on social media platforms, or save it to a cloud storage service. Simply select your preferred option, follow the prompts, and your screen recording will be shared.
Troubleshooting common problems with screen recording on iPhone
Screen recording on iPhone is a powerful feature that allows you to capture and share your screen activity. However, like any technology, it can sometimes come with its fair share of challenges. In this section, we’ll discuss some common problems that you may encounter while using the screen recording feature on your iPhone and provide troubleshooting tips to help you overcome them.
1. No audio in screen recordings: One of the most common issues users face is the absence of audio in their screen recordings. If you’re experiencing this problem, make sure that the microphone audio is enabled before you start recording. To do this, long-press the screen recording icon in the Control Center and check that the microphone icon is selected. If it’s already enabled and you’re still not getting audio, try restarting your iPhone and attempt the recording again.
2. Screen recording not saving: Another issue users sometimes encounter is screen recordings not saving in the Photos app. To address this, first check if there’s enough storage space on your iPhone. Should storage not be the issue, consider restarting your device and attempting to record again. Persistent problems might require updating your iOS to the latest version.
3. Glitches or lag in screen recordings: If your screen recordings are coming out glitchy or laggy, it could be due to a few factors. First, check that your iPhone’s performance is not compromised by closing unnecessary apps running in the background. Additionally, ensure that your device is running the latest iOS version, as updates often include performance improvements. If the issue persists, try adjusting the video quality settings in the screen recording options to a lower resolution.
4. Screen recording stopping abruptly: If your screen recording stops unexpectedly, it may be due to a few factors. First, check that you have sufficient battery power, as low battery levels can cause the recording to stop. Additionally, ensure that you have enough storage space on your iPhone, as a lack of space can interrupt the recording process. If these factors are not the issue, try restarting your device and attempting the recording again.
Additional applications to enhance your screen recording experience
If you’re looking to take your screen recording experience on iPhone to the next level, there are a variety of additional applications available that can enhance your recordings and add new features. These apps provide added functionality, editing tools, and customization options, allowing you to create professional-looking screen recordings.
One popular app that can enhance your screen recording experience is Capto. Capto offers a range of powerful editing tools, allowing you to trim and cut your recordings, add annotations and captions, and even blur sensitive information. With its easy-to-use interface and intuitive features, Capto is a great choice for users who want to edit their screen recordings quickly and efficiently.
Another app worth considering is ScreenFlow. ScreenFlow offers advanced editing capabilities, including the ability to add transitions, annotations, and even create picture-in-picture effects. It also provides options for recording from external devices and supports multi-channel audio. With ScreenFlow, you can take your screen recordings to the next level with professional-level editing features.
For gamers, ReplayKit Live is a fantastic app that allows you to live stream your screen recordings directly to popular streaming platforms like Twitch and YouTube. It also offers options for customizing your stream with overlays, chat integration, and even the ability to record your microphone audio while streaming. With ReplayKit Live, you can share your gameplay with a wider audience and interact with viewers in real-time.
Final thoughts
Screen recording on iPhone is a game-changer for many users. It opens up a world of possibilities for creating tutorials, sharing gameplay footage, troubleshooting technical issues, and preserving memorable moments. With just a few simple steps, you can enable this feature on your iPhone and start recording and sharing your screen like a pro.
But the benefits of screen recording go beyond just the basic functionality. By following practical tips such as clearing storage, planning your recording, using a stable surface, adjusting brightness and sound settings, utilizing gestures effectively, and editing your recordings, you can take your screen recordings to the next level.
Accessing and sharing your screen recordings is a breeze with the Photos app. Simply open the app, navigate to the Screen Recordings album, and choose the recording you want to share. With a few taps, you can send it via message or email, share it on social media, or save it to a cloud storage service.
While screen recording on iPhone is generally smooth and trouble-free, you may encounter some common problems along the way. However, by following the troubleshooting tips provided, you can overcome issues such as no audio in recordings, recordings not saving, glitches or lag, screen recording stopping abruptly, and difficulty finding screen recordings.
To enhance your screen recording experience even further, there are additional applications available, such as Capto, ScreenFlow, and ReplayKit Live. These apps offer advanced editing tools, live streaming capabilities, and more customization options to take your screen recordings to new heights.